I am a…


How To Format An Essay With Microsoft Word
Follow these steps to put a smile on your instructor’s face – and more importantly, to correctly format your essay.
- Click on the Microsoft Word icon on the computer screen
- After Microsoft Word loads, click on Format at the top of the screen and then on Paragraph
- In the Paragraph box, click inverted triangle next to Line Spacing and then click on Double from the drop down menu
- Click on “View” at top of screen and then click on “Header and Footer”
- You should now be in the “Header” box. Hold down the “Ctrl” button (on bottom of keyboard near the space bar), and press down the letter “R” once. The cursor should now be at the right hand side of the Header box
- Type in your last name (ex. Doe) and press the space-bar once
- In the blue and gray “Header and Footer” box, click on the white page icon (the one with the single pound sign: ex. # ) on the extreme left
- Click on the “Close” button. You should now see your last name and the numeral 1 in a light gray in the upper right hand corner of your document (ex. Doe 1).
- Wipe the sweat off your brow
- Type in you first and last name (ex. Jane Doe) and press the “Enter” key
- Type your Instructor’s name (ex. Dr. Bordelon) and press the “Enter” key
- Type your course name, number, and section (ex. English 021-06) and press the “Enter” key
- type in your full name and essay # (example: Emily Dickinson Essay #1)
- press the “Enter” key
- Shout “Yahoo!” really loud
- Click on “Insert” at top of the screen and then on “Date and Time”
- Click on the date in the month, day, year format (ex. July 15, 1999) and press the “Enter” key
- type in you title (Ex: How to Set Up MLA Format in Microsoft Word) and
- press the “Enter” key . (Note: do not bold or underline your title and do not put it in quotation marks)
- Press the “Back Space” key once and then the “Tab” key
- Begin typing your paper in MLA college essay format.
**Before ending your work session, remember to save back up copy to A:drive or flash drive.**
- Click on the Microsoft Word icon on the computer screen
- After Microsoft Word loads, click on “Format” at the top of the screen and then on “Paragraph”
- In the “Paragraph” box, click inverted triangle next to “Line Spacing” and then click on “Double” from the drop down menu
- Type short title of essay and press the space-bar once
- Press enter until the center of the page, hold down the ctrl key and press E once: then type in your title
- Press enter twice and type first and last name (ex. Jane Doe)
- Go down to end and type your course name, number, and section (ex. English 021-06) and press the “Enter” key, type professor’s name, enter, and the date.
- Almost there . . . . Hold down the “Ctrl” key and press the “Enter” key. You should be on a new page. Hold down Ctrl and press letter “E” once.” Type title
- Begin typing your paper in APA college essay format.
How to Add a Works Cited or List of Reference Page
- Scroll or page down to the end of your last paragraph
- Hold down the “Ctrl” key (on bottom of keyboard near the space bar) and press the “Enter” key once
- You’ve just created a “hard page break” that will keep your Works Cited page separate from the rest of your essay.
- hold down the “Ctrl” key (on bottom of keyboard near the space bar);
- press the letter “E” once (The cursor should now be at the middle of your screen);
- type “Works Cited” if using MLA citation or “References” if using APA (Note: do not bold or underline it); and
- Press the “Back Space” key once and begin adding your entries in alphabetical order .
Need Additional Assistance?
Visit occ’s writing center.
The Writing Center is open to OCC and Kean Ocean students and is here to assist with papers, research, presentations, and reading for any course. Our staff is filled with well-trained writing consultants that are available to assist at any step of the writing process you are in, from brainstorming to final editing we are here to help you succeed!
Visit our Writing Center site for location, hours, contact details, and to schedule your visit!

Microsoft 365 Life Hacks > Writing > Writing an Essay in MLA Format
Writing an Essay in MLA Format
Knowing how to write a Modern Language Association—or MLA—essay is an essential part of making it through school these days. Be warned, however, that daunting little tasks await around every corner—whether it’s knowing where to set your margins, how to edit a header, the right way to format a heading, and beyond!

While we can’t write your paper for you, this guide can certainly help you understand the proper MLA format for your essay. Keep reading to learn about writing an MLA-format paper with some tips for making sure it’s done right the first time.

Get the most out of your documents with Word
Elevate your writing and collaborate with others - anywhere, anytime
What is an MLA-format essay? It’s not uncommon for associations and organizations to follow a standard format and writing style. The Associated Press (AP) and University of Chicago styles are most common in professional settings. News outlets typically prefer the AP style, while businesses and creative agencies will choose the Chicago style. Academia, on the other hand, traditionally follows APA and MLA styles. APA (not the same as AP style) comes from the American Psychological Association and is used in scholarly articles. An MLA-format essay fits the established style for citing references and formatting essays established by the Modern Language Association.
Required elements of an MLA-format paper. MLA is the preferred style when writing an essay in high school and most college settings. As with other writing styles, there are specific characteristics and items an MLA-format paper needs to include to fit the bill of the style. Every MLA-format essay must include the following:
- One-inch margins
- Double-spaced text
- Easy-to-read font (typically Times New Roman) in size 12
- New paragraphs indented 0.5 inches
- Italicized media titles (books, magazines, etc.), no underlining
- Page numbers in the header 0.5 inches from the top of the page
- Oxford comma
- Center-justified title
- Headings and subheadings
- Clearly labeled and titled tables and figures
- Parenthetical citations
In addition to the listed elements above, every MLA essay must include a Works Cited. MLA format doesn’t require a title page, but it also doesn’t deem them unnecessary, so it’s up to your professor whether you’ll need one or not. One way to take the edge off the process of writing this type of essay is to use a free template or a handy built-in tool that helps you build bibliographies and more.

Tips for meeting MLA formatting guidelines. It’s said that the devil is in the details, and it’s never truer than when it comes to MLA-format essays. The following tips are areas to pay attention to when writing your essay:
- Set your margins. Your software might be set to one-inch margins, double-spaced text, and 0.5-inch indentations by default—but you can save yourself the trouble (and a headache) later in the writing process by adjusting them before you get started. Of course, one of the best parts about using a computer to write your essay is that you can always make adjustments later.
- Straighten out your headings . One area students might miss with MLA formatting is with the title, headings, and subheadings. It’s normal to want to use bold or italicized typeface on your titles and headings to make them stand out from the rest of the text. MLA style specifically calls for them to match the rest of the text without any alterations aside from title case. A centered or left-justified heading will stand out enough from the rest of your text that it needn’t any additional adjustments.
- Understand subheadings. While primary headings aren’t to receive any special formatting, subheadings will be changed to set them apart from their headings. For example, if your heading is about mammals, you might have subheadings about land and water mammals. You can further organize your water mammals subheading into types of whales and dolphins. Using subheadings helps to organize your writing and makes it easier to consume as a reader.
- Know how to cite your work. The information you’re presenting in your essay didn’t mysteriously appear from out of the ether. You need to give credit where it’s due when writing an MLA-format paper, so you’re giving credit to the original author of your sources. You can also improve your writing credibility and avoid plagiarism. Plagiarism is one of the biggest academic offenses a student can commit and could lead to expulsion in some cases. Properly citing your work with parenthetical citations and quoting authors when necessary will help to keep you covered.
When it comes down to it, practice makes perfect. The more essays you write, the better you’ll become at writing and meeting the expectations of MLA style. Before you know it, MLA format will be second nature, and everything will fall into place.
Still having a hard time visualizing what an MLA essay looks like? Check out a sample paper so you can see first-hand how they’re formatted!
Get started with Microsoft 365
It’s the Office you know, plus the tools to help you work better together, so you can get more done—anytime, anywhere.
Topics in this article
More articles like this one.

How to write a detailed review with AI
Good reviews help us make the right decisions. Learn how to write a great one with these AI tips.

Is it 'dragged' or 'drug'?
Do you mix up the words "drug" and "dragged"? Learn the difference and when to use each word so you'll never mistake them again

How to write a plot twist in your story
When executed carefully, a plot twist has the power to shock and dazzle your reader. Learn how you can incorporate one into your writing.

What's the difference between a memoir and an autobiography?
Explore the differences between memoirs, autobiographies, and biographies.

Everything you need to achieve more in less time
Get powerful productivity and security apps with Microsoft 365

Explore Other Categories

How to Set Up and Use MLA Format in Microsoft Word
The Modern Language Association (MLA) is an organization that provides guidelines for professional and academic writers. Many universities, employers, and professional agencies now require writers to conform to the MLA style since it’s easy to use and consistent.
In this article, we’ll cover how you can use the MLA format in Microsoft Word.


The MLA Format Requirements
Here are the basic MLA guidelines:
- Use 1-inch margins on all sides
- Use a legible font like Times New Roman
- Use 12 size font
- Use double-spacing throughout the entire document
- Use indentation for the beginning of each paragraph
- Include a header that displays your surname and page numbers on the top right-hand side
- The first page should include your name, paper information and date
- The title of your paper should be centered on the first page
- The end of the paper should include a Works Cited page with MLA citations
How to Set Up the MLA Format in Word
Here’s how you can organize your Word document so that it conforms to the MLA guidelines. We’ll cover each requirement in turn, so start at the top and work your way down.
1. Set the Margins
To set 1-inch margins:
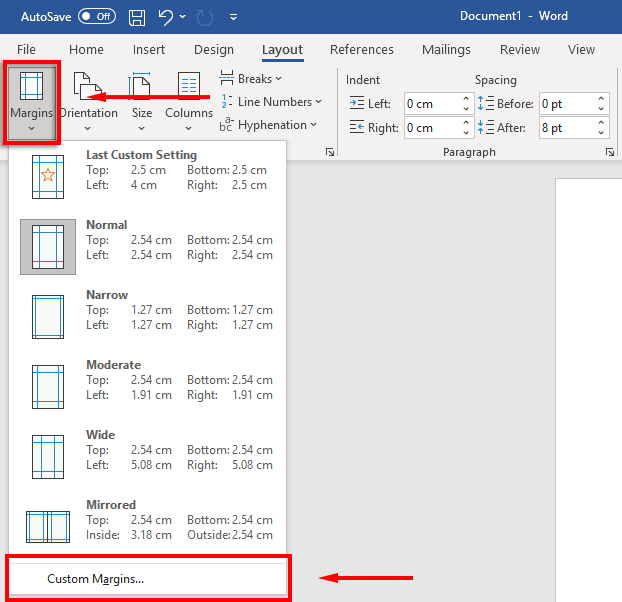
- Click on the Layout tab (in older versions of Word this will be Page Layout ).

- Select Margins then click Custom Margins .
- For the Top , Bottom , Right and Left margins, type 1 and press Enter .
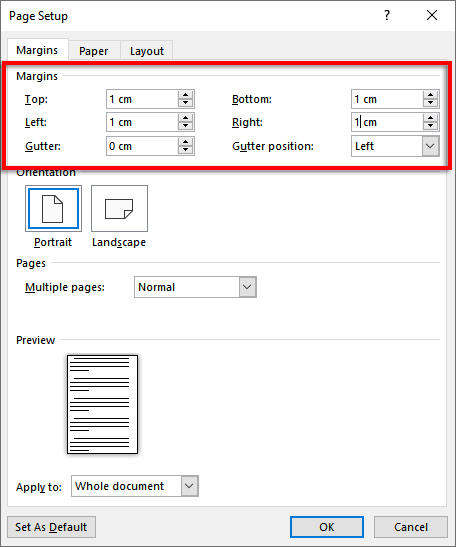
- Select OK .
2. Set the Font and Font Size
To change the font:
- Select the Home tab.

- Click the font drop-down menu and select the Times New Roman font (or a similar font like Calibri).
- Click the font size drop-down menu and select 12 .

3. Set Double Line Spacing
To set double-spacing:
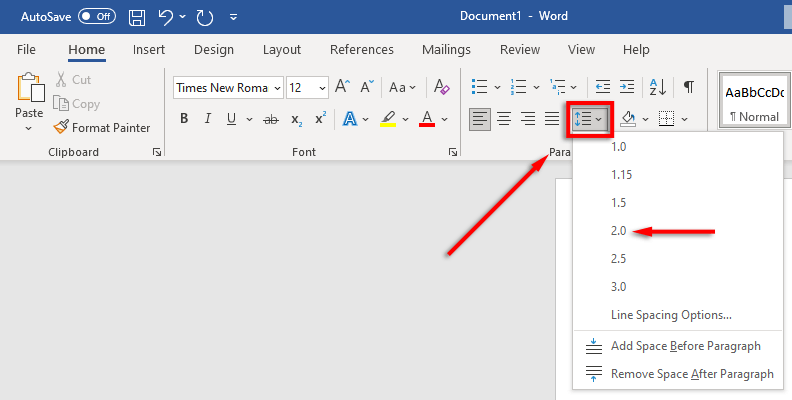
- Select the spacing drop-down menu . This icon looks like blue up and down arrows beside four horizontal lines. Click 2 .
4. Set the Indentation
To set paragraph indentation:
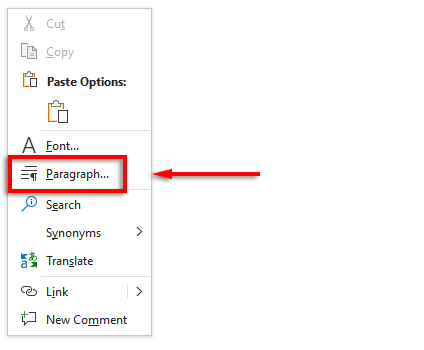
- Right-click the document and select Paragraph .
- Make sure the Indents and Spacing tab is selected.
- Click the drop-down menu beneath Special and select First line . Then, click the field beneath By and type 1 cm .
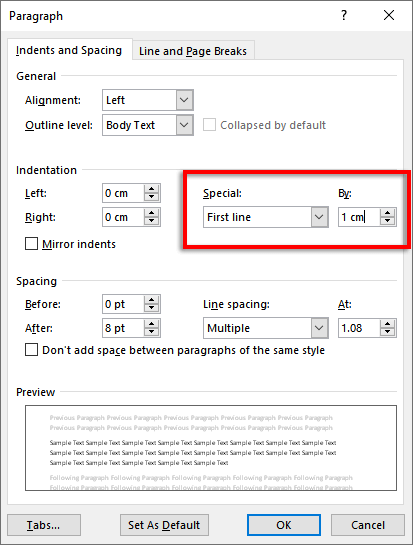
Alternatively, you can press the tab key before starting each new paragraph.
5. Set the Header
To set your header:
- Click the Insert tab.

- In the Header & Footer section, select Header and click Blank (the top option).
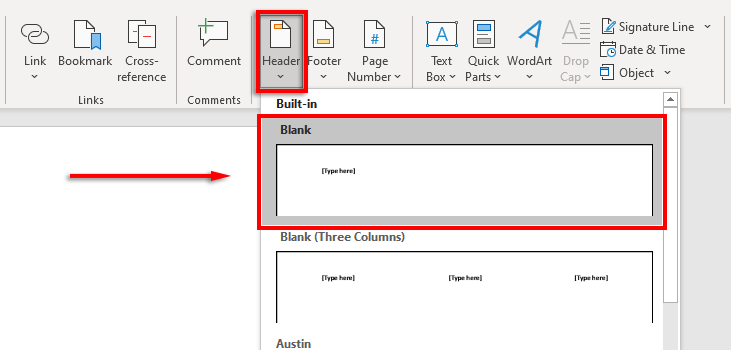
- In the header, type your name and press the spacebar once.
- Click the Home tab.
- Select Align Text Right in the Paragraph section.

6. Set the Page Number
To set page numbers:
- Using your cursor, click in the header after your name.
- Select the Header and Footer tab.

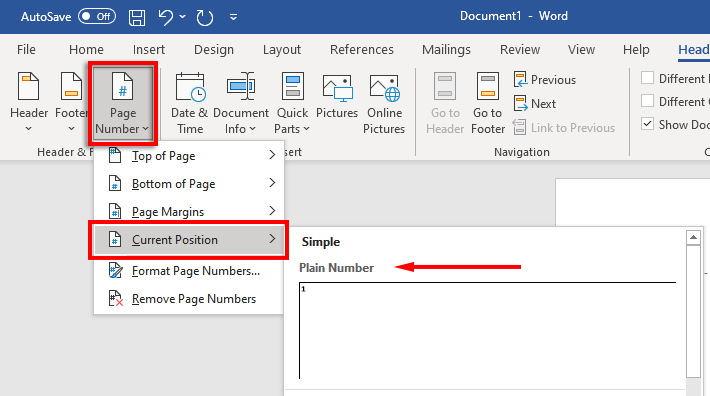
- Select Page Number , click Current Position and select Plain Number .
7. Include Key Information on the First Page
Now that your formatting is set up, it’s time to include the required information on the first page of your document.
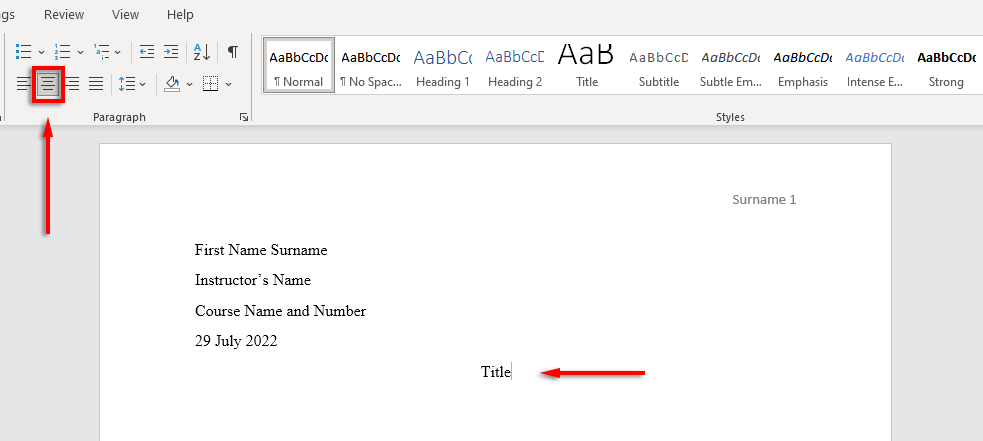
This should be one to four lines with your full name and other key information such as your course name, course number, instructor’s name, and date (written in a day, month, year format).
After the date, click the Enter key, type your document or research paper’s title and center the text by pressing Align Text Center in the Home tab.
8. Format the Works Cited Page
If you include citations in your document, these also need to conform to the MLA handbook. The list should be:
- Titled with “Works Cited” at the top of page
- In alphabetical order
- Left-justified
- Double-spaced
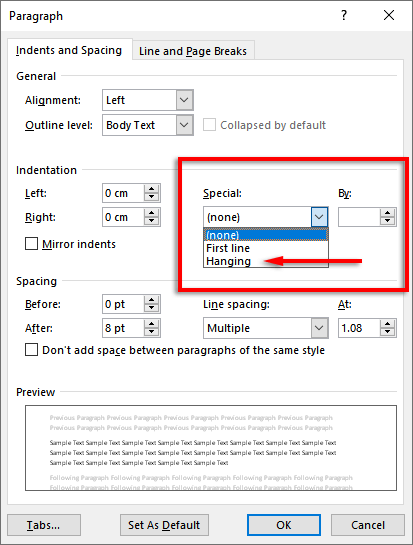
- Indented with a hanging indent
To include a hanging indent, select your citation list, right-click your document and select Paragraph . In the Indentation section, select the drop-down box underneath Special , select Hanging , and click OK .
Time to Get Writing
Now that you’ve formatted your MLA paper correctly, it’s finally time to get writing. With this formatting guide, you’ll have no trouble passing the MLA requirements. Just make sure to double-check your document before you submit it!
Jake Harfield is an Australian freelance writer whose passion is finding out how different technologies work. He has written for several online publications, focusing on explaining what he has learned to help others with their tech problems. He’s an avid hiker and birder, and in his spare time you’ll find him in the Aussie bush listening to the birdsong. Read Jake's Full Bio
Read More Posts:

- Skip to main content
- Skip to secondary menu
- Skip to primary sidebar
- Skip to footer
Erin Wright Writing
Writing-Related Software Tutorials
How to Use Microsoft Word (10 Core Skills for Beginners)
By Erin Wright
Do you want to learn how to use Microsoft Word quickly? This tutorial teaches ten core skills for beginners.
Table of Contents
How to Start a New Document
How to change the font, size, and color, how to change the alignment, line spacing, and indentations, how to add headings, how to change the margins, how to add images, how to add page numbers, how to add headers and footers, how to run the editor (spelling and grammar check), how to save and print your file.
Please note that this is a quick start guide. I have in-depth tutorials for most of these topics for those who would like to learn more.
Watch all the steps shown here in real time!
Explore more than 250 writing-related software tutorials on my YouTube channel .
The images below are from Word for Microsoft 365. These steps are similar in Word 2021, Word 2019, and Word 2016.
We will cover these ten core skills in Word for Mac in a separate tutorial.
- Open Word on your computer.
When Word opens, you will be in the Home screen of the Backstage view.
- Select Blank document to start a new document. (Alternatively, select Open if you want to open an existing Word document.)

When the new document opens, you will be in the Home tab in the ribbon , and your cursor will automatically be placed towards the top, left-hand corner of the page, ready to type.

You can change the font, size, and color before or after you type text. However, if you want to change existing text, first left-click, hold, and drag with your mouse to select the text.

- Select the Home tab in the ribbon if you are not already there (see figure 2).
- Select the menu arrow to open and choose from the (A) Font , (B) Font Size , or (C) Font Color menus in the Font group.

If you selected existing text, that text will change immediately. If you haven’t selected existing text, all new text will feature the choices you just made.
Further Reading: How to Change the Font, Font Size, and Font Color in Microsoft Word
Like the font choices shown above, you can change the alignment, line spacing, and indentations before or after you type text. However, if you want to change existing text, first left-click, hold, and drag with your mouse to select the text.
- Select the Home tab, if you are not already there (see figure 2).
- Select the Align Left , Center , Align Right , or Justify button to position the text on the page.

- Select the Line and Paragraph Spacing menu arrow and then choose a spacing option from the drop-down menu.

- Select the Decrease Indent or Increase Indent buttons to adjust the indent as necessary.

Further Reading: How to Adjust Line Spacing in Microsoft Word and Three Ways to Indent Paragraphs in Microsoft Word
You can turn existing text into a heading or choose a heading level before typing the heading text.
- Select the Home tab if you are not already there (see figure 2).
- Select a heading level from the Styles group.

- If the heading level you want isn’t visible, select the More button.

- Select a heading level from the menu that appears over the Styles group.

Further Reading: How to Create and Customize Headings in Microsoft Word
You can change the page margins for your entire Word document at once.
- Select the Layout tab in the ribbon.

- Select the Margins button and then select an option from the drop-down menu.

Further Reading: How to Adjust the Page Margins in Microsoft Word
- Place your cursor where you want to insert the image.
- Select the Insert tab in the ribbon, select the Pictures button, and then select the location of the image:
- This Device lets you choose an image stored on your computer or network server.
- Stock Images lets you choose stock images, icons, cutout people, stickers, and illustrations. The full stock image library is only available to users signed into Word for Microsoft 365.
- Online Pictures lets you search for images through Bing, Microsoft’s search engine.

For this tutorial, we will insert an image stored on the device.
- (For “This Device” option only) Locate and select the image in the Insert Picture dialog box and then select the Insert button.

Your image should now appear in your Word document.
- (Optional) Select one of the resizing handles and then drag the image to a new size.

- (Optional) Select the Layout Options button and then choose how the image is positioned with the surrounding text:
A. In Line with Text
E. Top and Bottom
F. Behind Text
G. In Front of Text
The effect of each option will depend on the size of your image and the density of your text. So, you may need to experiment with several options to find the one most suited to your content.

Further Reading: How to Insert and Modify Images in Microsoft Word
- Select the Insert tab in the ribbon (see figure 13).
- Select the Page Number button and then select a location from the drop-down menu, followed by a design from the submenu.
- Select the Close button to close the Header and Footer tab. (This tab only appears when the Header and Footers areas are active.)

Further Reading: How to Add Page Numbers in Microsoft Word
- Select the Header or Footer button and then select a design from the drop-down menu.

- Type your text into the placeholders.

- Select the Close button to close the Header and Footer tab (see figure 18).
Further Reading: How to Insert Headers and Footers in Microsoft Word
In Word for Microsoft 365, the spelling and grammar check is called the Editor. Your spelling and grammar options will depend on which version of Word you are using. Therefore, your interface may look different than the images shown below.
- Select the Review tab in the ribbon and then select the Editor button. (Older versions of Word will have a Check Document button, instead.)

- Select the corrections or refinements category you want to review in the Editor pane.

- If Word finds a possible error, select a recommendation or select Ignore Once or Ignore All .

Word will automatically move to the next issue within the category.
- Select a new category or select the closing X to close the Editor.

What Is the Difference between the Editor Button and the Spelling and Grammar Button?
You may notice a Spelling and Grammar button next to the Editor button in the Review tab. This button provides a quick way to check only spelling or spelling and grammar without checking the additional refinements reviewed by the Editor.

Further Reading: How to Use the Editor in Word for Microsoft 365
I recommend saving your file before printing just in case there is a disruption during the printing process.
- Select the File tab in the ribbon.

- Select the Save tab in the Backstage view.

- Select the location where you want to save the File.

- Type a name in the File Name text box and then select the Save button.

- Once you have saved your document to a specific location, you can then select the Save icon if you make changes to the document later.

- To print, reselect the File tab (see figure 26) and then select the Print tab in the Backstage view.

- Ensure the correct printer is selected and turned on, enter the number of copies into the text box, and then select the Print button.

From there, follow any additional dialog boxes provided by your printer.
Updated November 26, 2023
- Microsoft Word Tutorials
- Adobe Acrobat Tutorials
- PowerPoint Tutorials
- Writing Tips
- Editing Tips
- Writing-Related Resources

IMAGES
VIDEO
COMMENTS
Finding and citing sources. Get a head start on collecting sources and ideas for a big paper by searching key words in Researcher in the References tab of your document. Researcher uses Bing to search the web and deliver high-quality research sources to the side of your page. Search for people, places, or ideas and then sort by journal articles and websites.
Click on the Microsoft Word icon on the computer screen; After Microsoft Word loads, click on Format at the top of the screen and then on Paragraph; In the Paragraph box, click inverted triangle next to Line Spacing and then click on Double from the drop down menu; Click on "View" at top of screen and then click on "Header and Footer"
When more than one person is editing in Word for the web, everyone will see each other's updates in the document. For more about how this works, see Work together on a document in Word for the web. Turn in a hard-copy version. When you're finished, print out your paper to turn it in. You can do this with the paper still open in Word for the web.
Each college essay typically sticks to the following structure: Introduction: Every essay should begin by situating its readers. Use an opening hook to grab their attention, then provide them with the wider context that your essay is working within. Summarize the ideas that your essay will explore and end your introduction with a thesis statement.
Now, let's address specific parts of your argumentative essay so that you can create a persuasive and compelling argument. How to write an argumentative essay introduction . Knowing how to write an argumentative essay introduction requires three main parts. You need to include a solid hook, your thesis, and your talking points.
Begin typing your paper in MLA college essay format. **Before ending your work session, remember to save back up copy to A:drive or flash drive.** APA Format. Click on the Microsoft Word icon on the computer screen; After Microsoft Word loads, click on "Format" at the top of the screen and then on "Paragraph"
MLA is the preferred style when writing an essay in high school and most college settings. As with other writing styles, there are specific characteristics and items an MLA-format paper needs to include to fit the bill of the style. Every MLA-format essay must include the following: One-inch margins; Double-spaced text
The Modern Language Association (MLA) is an organization that provides guidelines for professional and academic writers. Many universities, employers, and professional agencies now require writers to conform to the MLA style since it's easy to use and consistent. In this article, we'll cover how you can use the MLA format in Microsoft Word. The MLA
Figure 12. Margins menu. Further Reading: How to Adjust the Page Margins in Microsoft Word How to Add Images. Place your cursor where you want to insert the image. Select the Insert tab in the ribbon, select the Pictures button, and then select the location of the image:; This Device lets you choose an image stored on your computer or network server.; Stock Images lets you choose stock images ...
A tutorial on how to set up an MLA format essay (8th edition, 2017) in Microsoft Word 2016.Learn how to make MLA format citations: https://owl.english.purdue...